ThumbBorker
(last updated January 15, 2005)

What it Is
ThumbBorker is a picture browser that lets you create thumbnails from your image files. It can also generate an HTML page to show off your new thumbnails. What is a thumbnail? It's a smaller version of a picture that you can put on a webpage, and then you can link to a larger version of the picture (or some other page).ThumbBorker is freeware. Use and enjoy. The source code is available too. Any questions or comments? Send them to thumbborker-help@borkware.com
ThumbBorker started life as a custom program for a major skateboard manufacturer. They needed to chew through large volumes of photographs taken at skateboard competitions to create web page thumbnails. The thumbnails show the Exciting Part of the photo, and are a link to the larger, complete picture. They have kindly granted us permission to release the program for free.
Raving fan Suzanne Johnston raved:
I have just downloaded and used "Thumbborker" and wanted to let you know I think it's terrific!To which we reply:I downloaded several thumb creating programmes, both free and expensive, before I tried Thumbborker and struggled with all of them. Thumbborker is not only easy to use for someone without a lot of computer smarts (moi) but the 'how-to" instructions in Help are written in simple plain English...perfect. Thank you!
:-)Versions
- 1.0 : it works! (January 15, 2003)
Download
ThumbBorker only works on Mac OS 10.3 (Panther) or later.
- Download ThumbBorker (v1.0), 428K, (disk image format)
- Download Pröject (with source) (v1.0), 588K (tar.gz format)
How to use it
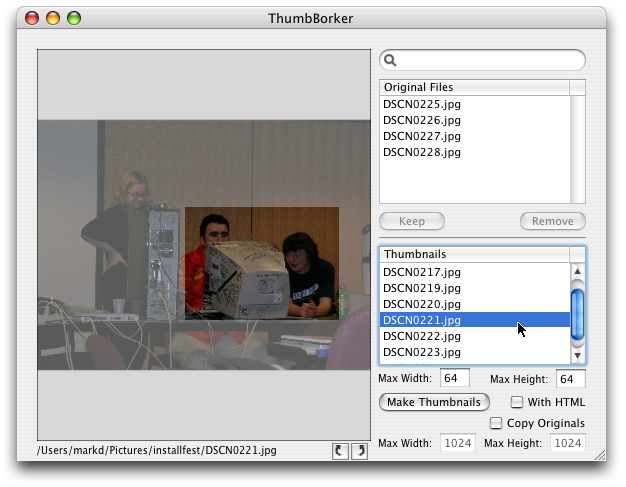
Here's a quick run-through of using ThumbBorker. We'll be making a page of some pictures taken at an InstallFest put on by the Western Pennsylvania Linux User's Group. You can see the final page as generated by ThumbBorker.First start up ThumbBorker, and get the main (only) window:
The Different areas of the window are (going mostly clockwise):
So tell ThumbBorker to Load a Directory (File menu, Load Directory). Choose a folder, and ThumbBorker will walk that folder (and any subfolders) looking for image files, like *.gif, *.jpg, *.png, and so on:
- The Big Blank Area : This is where the pictures will be displayed. You can drag-select in this space to choose what subset of the pictures to make thumbnails with.
- The Magnifying-Glass Text-Search-Box Thingie : You can type in here to filter the list of files being shown. If all your files are named DXM-9182.jpg, then it's probably not too useful. But sometimes you may be browsing a set of images that have reasonable names and want to concentrate on just a couple
- The "Original Files" List : It holds the list of image files that ThumbBorker finds on your disk.
- The Keep Button : Moves the file down to the Thumbnails list.
- The Remove Button : Removes the image file from the Original Files list. This does not remove the file from your disk. The fill will still be around for you to use and abuse later.
- The "Thumbnails" List : It holds the list of images you want to create thumbnails for.
- Max Width / Max Height : This is the maximum width and height for a Thumbnail. The thumbnails (whether they be the entire image, or just a selection) will be scaled proportionally to no larger than these sizes.
- With HTML : Check this to have ThumbBorker generate an
index.htmlpage of the thumbnails.- Copy Originals : Check this to have the complete original image file copied to the same place the thumbnails are deposited. If you have this selected and With HTML selected, the
index.htmlpage will have hyperlinks connecting the thumbnails with their original images- The other Max Width / Max Height : the copied originals will be scaled too. Typically digital cameras produce HUGE images, which aren't practical to use as a "hey look at this picture on the web page".
- The Funky Arrow Buttons : These rotate the image clockwise and counter-clockwise. They do not change the original image on disk.
- And finally the little "No Selection" text at bottom : shows the path to the image file being displayed.
Once ThumbBorker has groveled around for images, you'll see something like this:
The "Setting up the Room" picture is necessary, but kind of dull. Let's make a more interesting thumbnail: Click and drag to highlight something Really Interesting, like the stack of chairs:
So now when the thumbnails are generated, the thumbnail will be that stack of chairs. Click the Keep button to say "Yes, I want to make a thumbnail out of this"
You can see that the image has moved down to the Thumbnails portion of the window. ThumbBorker automatically displays the next picture (our snack table, the router, and the WPLUG Fearless Leader wearing a stylish Borkware T-Shirt)
You might come across a picture that was taken sideways:
Have no fear. Click the little Rotate button on the bottom to make it stand up straight:
You can click on pictures in the Thumbnails list to tweak them too, if you decide later you want to change their thumbnail selection area:
And then you just keep chugging through the pictures, keeping the ones you want to make thumbnails out of, and removing the ones you don't want to deal with. Here is the window after going through all the pictures:
Now it's time to actually generate the thumbnails. For the WPLUG thumbnails, something larger than 64x64 would be nice (say 200x200). We're going to generate an HTML page, and also copy and scale the original images:
ThumbBorker then prompts you for a directory to save everything in. You'll probably want to create a new directory to put things into:
ThumbBorker will then chew through your images and create the thumbnails, HTML page, and any original copies. In fact, you can see the finished product here.
The whole process, while it seems pretty voluminous here on a webpage, actually only takes two or three minutes to chew through a dozen pictures, choose which ones to use, and what areas to use for thumbnails.
You can customize the HTML that's generated. Choose "Show HTML Snippets" from the Image menu, and a sheet will drop down letting you tweak individual elements:
Here are the different elements you can tweak:
What the original client ended up doing was having some skeleton HTML generated so they could verify the page generally looks like they want, and then they used a perl script to post-process the HTML to be more in line with their style guides.
- Document Header : What gets placed into the HTML first.
- Before Thumbnails : Is added to the page before any thumbnails are generated. If you're putting them in a table, use a
<table>tag- For each image : This is generated for every image. Put in the magic cookie
%@to place theimgtag, along with itswidthandheightattributes. If you have "Copy Originals" selected, this will also have theAtag.- For every X images : If you want to break up the images, say have three thumbnails in a row in a table, you can use this spot for HTML to be emitted after every X images (where you can specify X). In this case, since we're using a table, every three rows needs to end the current row and start a new one.
- After Thumbnails : This terminates any constructs opened by Before Thumbnails.
- Document Footer : Any final stuff for the page, such as a signatory line.
And that's ThumbBorker in a nutshell. We hope you enjoy it.
Known Problems
In 1.0
- None so far.
Why write a new thumbnailer?
Why not just use one of the existing bajillion thumbnailler programs on VersionTracker?The client couldn't find the mix of features, robustness, and source code availability with the current options. They decided to hire Borkware for a couple of days to give them the exact application that fits in with their workflow. ThumbBorker was about 4 billable days of work from start to finish.
Items of Interest about the code
- Uses Cocoa Bindings for much of its UI work.
- A bindings-aware custom view.
- Using Key-Value Coding to allow arbitrary attributes to be placed on objects.
- Custom NSArrayController for filtering the contents of the Original Files list.
- Changing objects bindings to controllers on the fly, allowing the image view and the status line to be driven by two different NSTableViews
- Scaling images and converting to JPEG
- NSAffineTransform manipulations to map between image coordinates and view coordinates.
- Includes a help file for AppleHelp
- Using the UserPreferences system to store configuration information.
- Plus lots of the usual code commentary you've come to know and love from Borkware.